Introducing Shrubbery: a cheap BMC-equivalent for Linux Machines
Published on in Projects, Shrubbery
I run a little server on my apartment network for small services (an IRC bouncer, some screens, SSH and MD-Raid). However, I’m not always at the machine when I’m working on it. I have, in the past, been lucky and not taken it totally offline when doing upgrades remotely. Until this week.
Having now accidentally removed myself from all the services I usually use, I’m frustrated. In my work life, I often use servers which have Baseboard Management Controllers (BMC). The BMC is a device which sits on the motherboard of a machine and is able to do many things - report on sensors, whether the machine is powered or not, change the power status and connect a serial console. A properly configured BMC makes it possible to do pretty much anything to a machine remotely, save for adjusting the hardware. In my current conundrum (a kernel which won’t boot), this would be immensely helpful - I could use the serial console to select an older, working kernel and then fix the newer, broken kernel.
So, I have decided to build a device that will perform a very similar function to a BMC. At the suggestion of a friend, I’m calling it shrubbery, as it is the “badly trimmed hedge between the real world and [my] machine”.
Features
Shrubbery needs to be able to perform what I consider the critical features of a BMC. That is, it needs to be able to:
- Power cycle the machine
- Connect to the serial console
- Be available on the network
Much of the reporting I do not see as critical, though I will implement it if I am able.
Furthermore, because I left the power pins disconnected on my motherboard, I plan to have both ‘soft’ and ‘hard’ power cycles. Soft power cycle will be where I ask my BMC to press the power button for me (by flipping a relay connected to the motherboard power pins). Hard will involve physically flipping the 120V power line connected to the server, again, via a relay.
Hardware
Major Components
The center of this device is a Atmel ATmega168. This is the same (family) of chip that is at the center of the Arduino family. This was chosen for its power (though it is almost certainly overkill), and wide range of support (since so many people are already used to this family because of the Arduino). Frankly, other chips would also have been solid options (the MSP430 line comes to mind), but likely don’t have as solid support for the Ethernet controller chip.
The mega168 has built in serial communication. However, it doesn’t speak at the right voltage levels for RS-232 (which is what the motherboard speaks). So we need what is called a level converter. The common one to use is a MAX232. This would be great, except that the circuit will run at 3.3V logic levels (The ENC28J60 runs at 3.3V only). The MAX232 has a 3.3V variant, the MAX3232. However, the MAX3232 is no longer produced in a DIP package, meaning that the only variants are surface mount. I have an intense dislike for soldering surface mount components, so I went looking for other options. (The MAX3232 is also $9-13 - more than the mega168, which seems a bit ridiculous). What I found to replace it is the Exar SP3232E. This part performs the same function, costs much less, and comes in a through-hole mountable package.
The final major component is the Ethernet controller. On the recommendation of my friend NWF, I’ve chosen the ENC28J60. It is a widely used and very popular Ethernet controller. Fortunately, it also already has several pre-written stacks for doing IP traffic on the ATmega family MCUs.
Other Components
The other important components are the relay for switching 120V and the MagJack used for the RJ45 plug. Both of these are relatively simply swapped, so I won’t go into much detail about them.
Other Choices
In the process of designing this, I had to make several other choices.
The most important of these is where the board and components get power from. I looked at taking the power directly from the 120V line I was already switching, but decided against it. This would necessitate more running of 120V on my board than necessary, something I really want to avoid. I’ve electrocuted myself enough to not be over-eager to repeat the experience. It also seems relatively sane to try to keep the high voltage as far from the rest of the components as possible. Having a distinct power source for the Shrubbery also allows one to easily disable a misbehaving shrubbery. However, it still can’t be easily removed from the line without shutting the server down. Nor would I consider this safe enough to allow work on the Shrubbery while 120V was still running anywhere.
The Circuit!
The full circuit diagram is here:
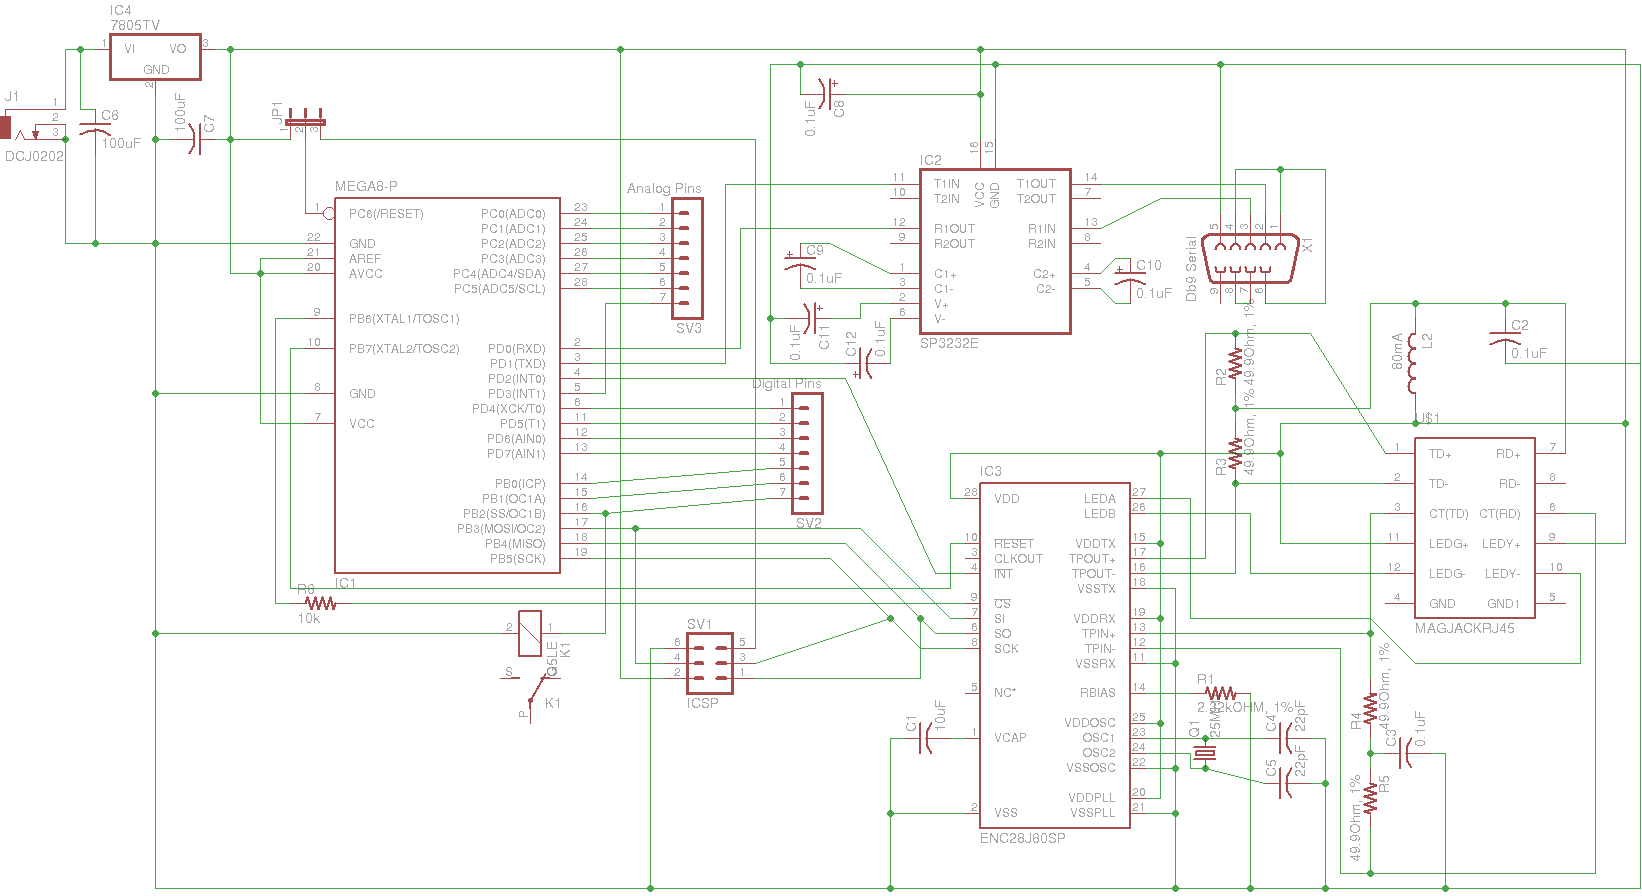
Download the Eagle files - available under the New BSD License - license text.
Parts List
All parts link to their respective Digi-key pages. The total cost for parts from Digi-key is about $40+tax&shipping.
| Quantity | Digikey Part Number | Purpose |
|---|---|---|
| 1 | ATMEGA168A-PU-ND | Central Processor |
| 1 | ENC28J60-I/SP-ND | Ethernet Processor |
| 1 | 1016-1103-5-ND | RS-232 Level Converter |
| 1 | 507-1442-ND | MagJack RJ-45 Ethernet jack |
| 1 | AE10657-ND | 120V switched power in |
| 1 | 208979-2-ND | 120V switched power out |
| 1 | Z3326-ND | 120V switched power relay |
| 1 | 209FE-ND | RS-232 DB9 Female jack |
| 1 | AP1086T33L-UDI-ND | 3.3V Regulator |
| 1 | 237-1418-ND | Wall to board power (120v to 5V) |
| 1 | CP-009AH-ND | Wall to board power jack |
| 1 | 445-2863-ND | C1 |
| 2 | 445-5258-ND | C2,C3 |
| 2 | 445-4718-ND | C4,C5 |
| 2 | 445-8441-ND | C6,C7 |
| 5 | P14498-ND | C8-C12 |
| 1 | 2.32KXBK-ND | R1 |
| 4 | 49.9XBK-ND | R2-R5 |
| 1 | 10.0KXBK-ND | R6 |
| 1 | P9818BK-ND | L1 -Ferrite Bead |
| 1 | 887-1500-ND | Q1 - Crystal |
| 1 | 609-3218-ND | ICSP Header |
| 2 | A19332-ND | Headers for ATmega168 unused pins |
| 1 | A31113-ND | ICSP programming enable pins |
| 10 | A26228-ND | Jumpers for ICSP select (Min. order 10) |
You might also wish to buy a project box. At the very least, you WILL NEED TO DO SOMETHING TO SHIELD YOURSELF AND YOUR ENVIRONMENT FROM THE 120V LINES. Seriously, 120VAC is not fun to have run through you. I don’t properly know the dimensions needed at this point, so I’m not going to comment on what size project box. I also have rather a collection, so I won’t be buying one anyway. (Though if I get particularly whimsy, I may make one).
Why not an Arduino and an EtherShield?
Good question. There are two big reasons:
One, cost. An Arduino and an EtherShield is almost $75 worth of hardware. The cost to me (accounting for parts I already had and free/sample parts) is about $35 - the cost of the Arduino alone.
Two, the learning experience. This is the first big circuit I’m designing on my own. (Strictly speaking, I had a ton of help, but the legwork is all mine). I’ve never designed an MCU-based solution at the hardware level. Sure, I’ve used Arduinos and MSP430s, but it just isn’t quite the same learning experience. Which is the real reason I’m not doing an Arduino - I want the learning experience that is designing a circuit from the ground up.
Why only Linux Machines?
When introducing the idea behind this device, i specified that this would work only for Linux machines. this isn’t strictly true - it will work for any machine that can be controlled via a serial console. However, these are fairly rare in our modern world - even Linux rarely comes properly set up for the serial console to be used. Any system which can be spoken to over RS-232 serial ought to be comparable with Shrubbery. I, however, am only going to be providing setup directions (and a client, when the time comes for that) for Linux.
Conclusion
That’s it! The circuit is planned. As I keep working on this and get further into it, I’ll keep updating this - mostly with code and other parts required to make this whole thing work. This, hopefully, is the end of hardware, other than assembling it (don’t worry, I’ll provide pictures!), so if you’re afraid of hardware, there really isn’t too much of it.
Finally, this project (circuit diagram and design, source code, and all related files) are available under the New BSD License, text here.